Introduction & Setup
1. Introduction to Qt
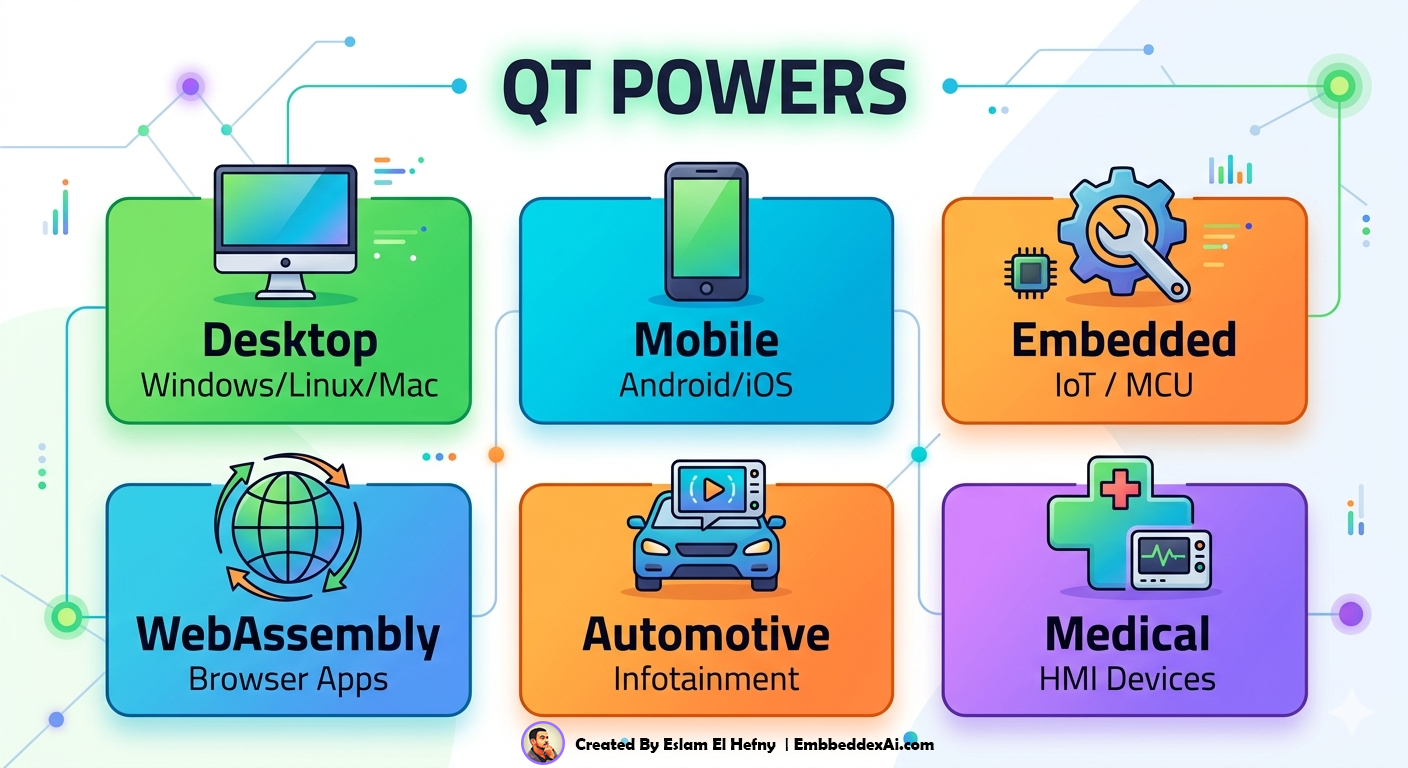
Qt (pronounced “cute”) is a cross-platform application framework written in C++. It provides a comprehensive set of libraries and tools for building:
Qt Ecosystem — Module Map
%%{init: {
  "theme": "base",
  "themeVariables": {
    "primaryColor":       "#6366f1",
    "primaryTextColor":   "#ffffff",
    "primaryBorderColor": "#4f46e5",
    "lineColor":          "#6366f1",
    "secondaryColor":     "#0ea5e9",
    "tertiaryColor":      "#f0f4ff",
    "backgroundColor":     "#ffffff"
  }
}}%%
mindmap
  root((Qt Framework))
    )🧠 Core(
      Qt Core
      Qt Concurrent
      Qt SQL
      Qt XML
    )🎨 UI(
      Qt Widgets
      Qt Quick
      QML
      Qt WebEngine
    )🔌 Connectivity(
      Qt Network
      Qt SerialPort
      Qt Bluetooth
      Qt WebSockets
    )🛠️ Tools(
      Qt Creator IDE
      Qt Designer
      CMake
      Qt Linguist
    )🚀 Deployment(
      Windows
      Linux
      macOS
      Android · iOS
      Embedded MCU
2. Why Qt?
Key Advantages
| Feature | What It Means |
|---|---|
| Write Once, Run Anywhere | Same C++ codebase → Windows, Linux, macOS, Android, iOS, Embedded |
| Signals & Slots | Built-in type-safe event system — no manual callbacks |
| Qt Creator IDE | Integrated designer, debugger, profiler, and device deployment |
| Embedded-First | Used in automotive HMI, industrial panels, medical devices |
| Dual License | Open-source (LGPLv3) + Commercial — use freely in most projects |
| Best-in-class Docs | Official docs + examples for every class |
| QML / Qt Quick | Declarative UI language for modern animated interfaces |
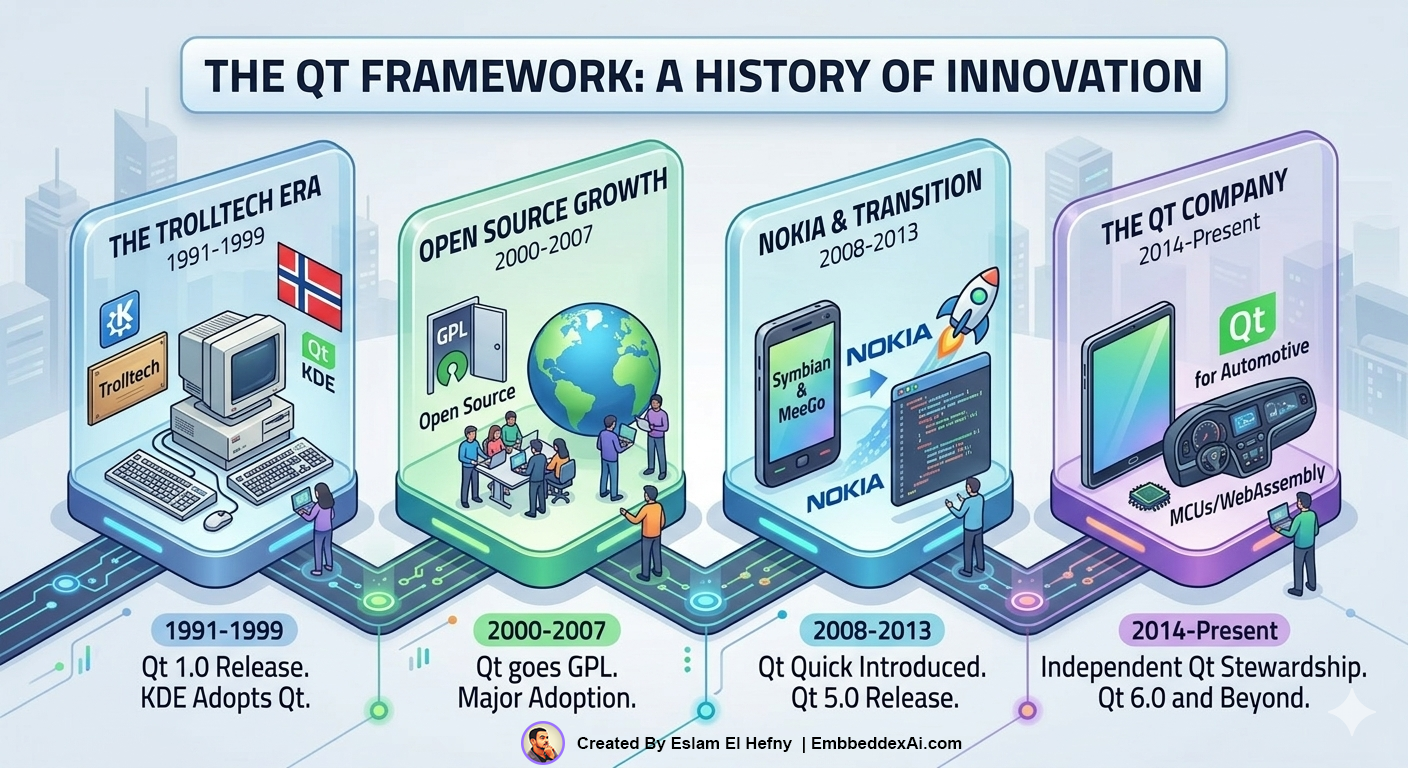
3. History of Qt
4. Setup — Step by Step
4.1 Windows
Requirements: Windows 10+ (64-bit) · ~10 GB free disk · Internet connection
Step 1 — Download the Installer
Go to qt.io/download → Open Source → download:
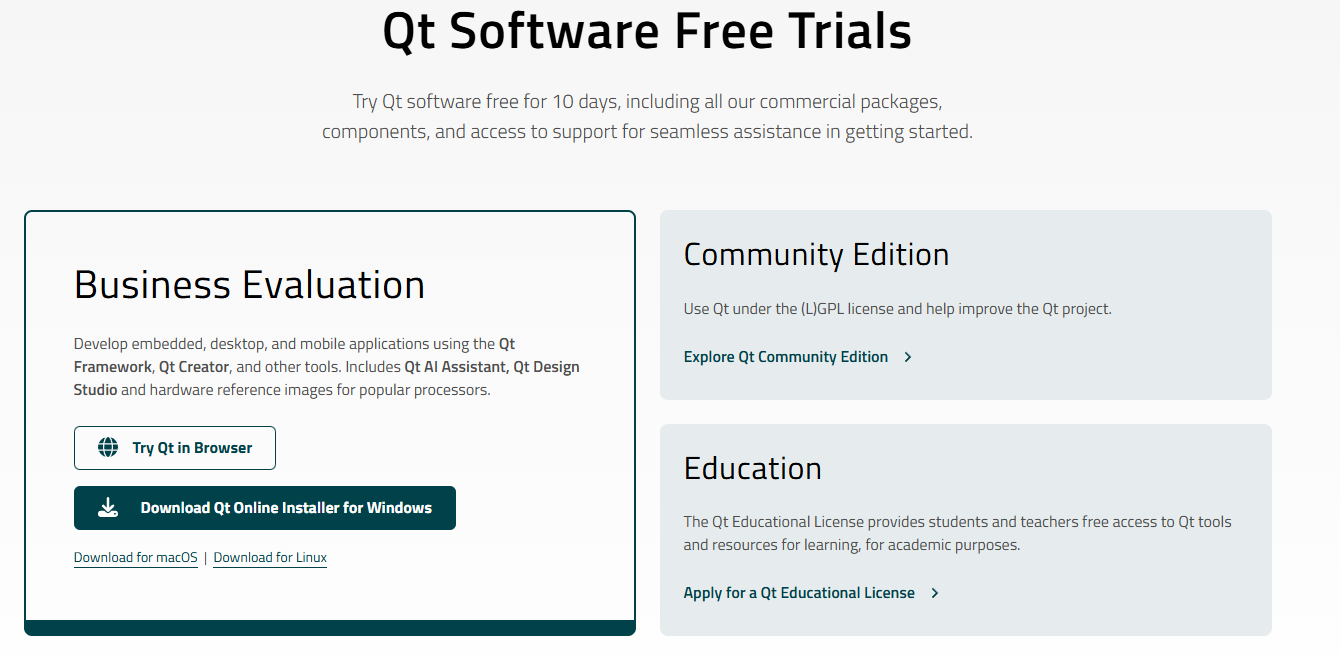
after Download : qt-online-installer-windows-x64-*.exe
Step 2 — Run & Log In
Double-click the installer → log in or create a free Qt account → select “Qt for open-source development” → accept LGPL license.
Step 3 — Select Components
Qt
└── Qt 6.x.x  (latest stable)
    ├── MSVC 2022 64-bit        ← if you have Visual Studio installed
    ├── MinGW 13.1.0 64-bit     ← recommended for beginners (compiler bundled)
    └── Qt Creator              ← IDE (auto-selected)

Developer and Designer Tools
└── MinGW 13.1.0 64-bit         ← the actual MinGW compiler toolchain
Tip: No Visual Studio? Use MinGW — the compiler ships with Qt, nothing extra needed.
Step 4 — Install
Click Next → Install and wait 10–30 minutes depending on your connection.
Step 5 — Verify
Open Qt Creator → Edit → Preferences → Kits — you should see a kit with a green checkmark. If not, see the Kit Fix note below.
# Optional — verify from command line (Qt MinGW shell)
qmake --version
# Output: QMake version 3.x  /  Using Qt version 6.x.x
4.2 Linux (Ubuntu / Debian)
Option A — Online Installer (Latest Qt 6, full control)
# Make executable and run
chmod +x qt-online-installer-linux-x64-*.run
./qt-online-installer-linux-x64-*.run
Select the same components as Windows above (GCC 64-bit instead of MinGW).
Option B — Package Manager (Faster, Ubuntu/Debian)
sudo apt update
sudo apt install qt6-base-dev qt6-tools-dev qt6-tools-dev-tools qtcreator
sudo apt install qt6-declarative-dev       # Qt Quick / QML support
sudo apt install libqt6serialport6-dev     # Serial port (for embedded use)
Verify
qmake6 --version
# QMake version 3.x  /  Using Qt version 6.x.x

qtcreator &
# Qt Creator should open
4.3 macOS
Requirements: macOS 11+ · Intel or Apple Silicon (M1/M2) · ~10 GB free disk
Step 1 — Install Xcode CLI Tools
xcode-select --install
Wait for the popup and click Install (~5 minutes).
Step 2 — Download the Installer
Go to qt.io/download → Open Source → download:
qt-online-installer-mac-*.dmg
Step 3 — Select Components
Qt
└── Qt 6.x.x
    └── macOS               ← works on both Intel and Apple Silicon

Developer and Designer Tools
└── Qt Creator
Apple Silicon (M1/M2): Qt 6.2+ includes native ARM64 support — make sure you download the ARM64 variant of the installer.
Step 4 — Verify
/path/to/Qt/6.x.x/macos/bin/qmake --version
# Using Qt version 6.x.x
Kit Fix
If Qt Creator shows no kit or a red/yellow warning:
- Go to
Edit → Preferences → Kits - Click Add
- Set:
- Compiler:
MinGW 13.1.0 64-bit(Windows) or systemGCC(Linux/macOS) - Qt version: Browse to
qmakein your Qt install folder
- Compiler:
- Click OK — the kit should turn green
What You Should Have After Setup
| Tool | Purpose | Check Command |
|---|---|---|
| Qt 6.x.x | Framework libraries | qmake --version |
| Qt Creator | IDE | Opens without errors |
| Compiler (MinGW/GCC/Clang) | Builds C++ code | Kit shows green in Creator |
| CMake | Build system | cmake --version |
Apple Silicon (M1/M2): Qt 6.2+ supports native ARM64. Make sure to download the ARM64 variant.
5. Running Your First Qt Program
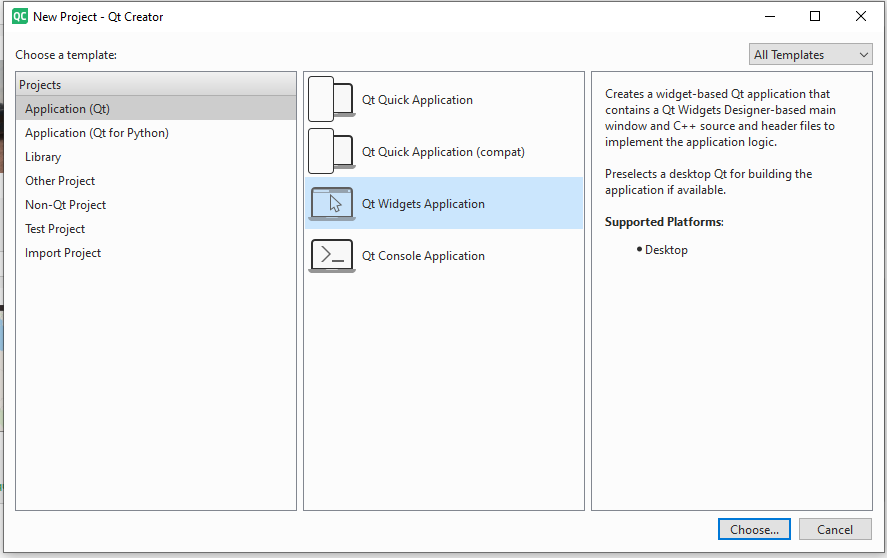
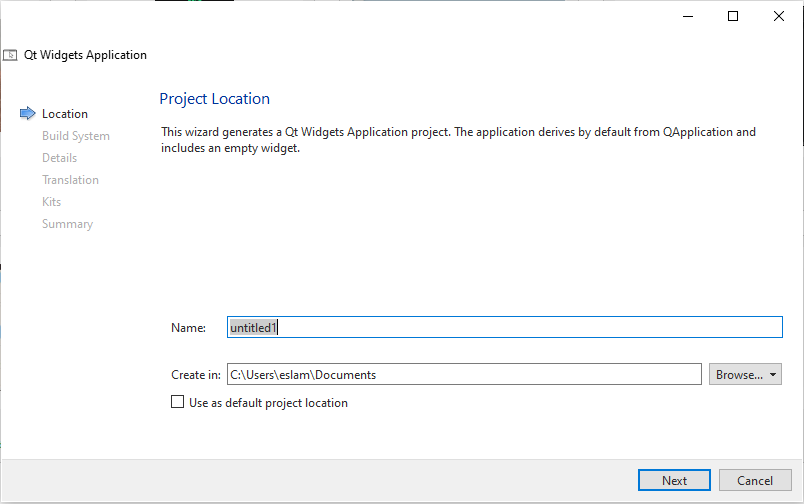
5.1 Create Project in Qt Creator
1. Open Qt Creator ==> from File select New Project

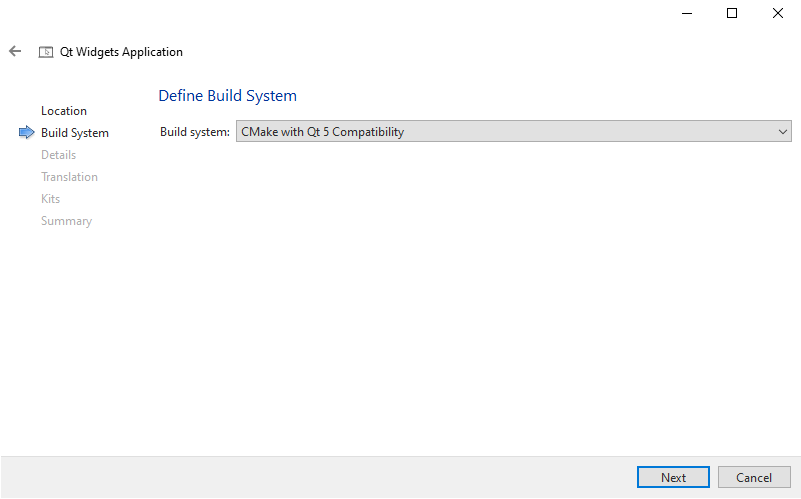
3. then Qt Widgets Application
in "Name: HelloQt\nLocation: your folder"
then write your Application name and Location
then
"Select Kit\nMinGW / GCC / Clang" Class: MainWindow
then
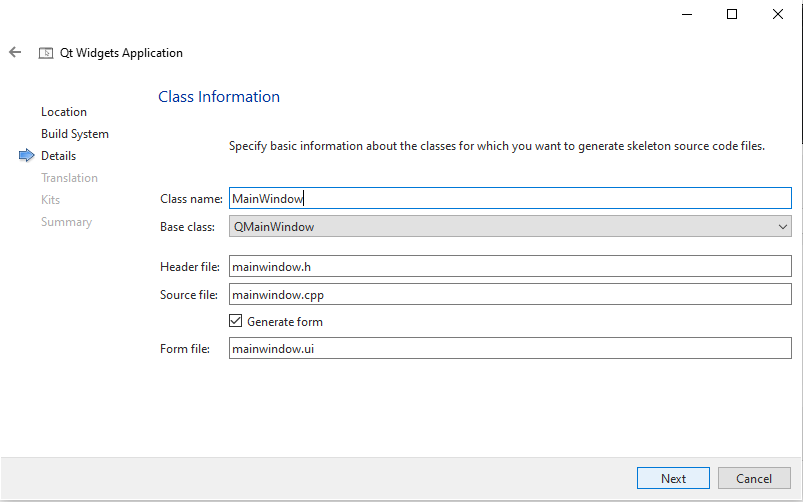
and Last Finish
5.2 Project Structure
HelloQt/
├── CMakeLists.txt       ← build system config
├── main.cpp             ← entry point — starts the app
├── mainwindow.h         ← MainWindow class declaration
├── mainwindow.cpp       ← MainWindow logic
└── mainwindow.ui        ← UI layout (XML — edited via Qt Designer)
5.3 The Code — Annotated
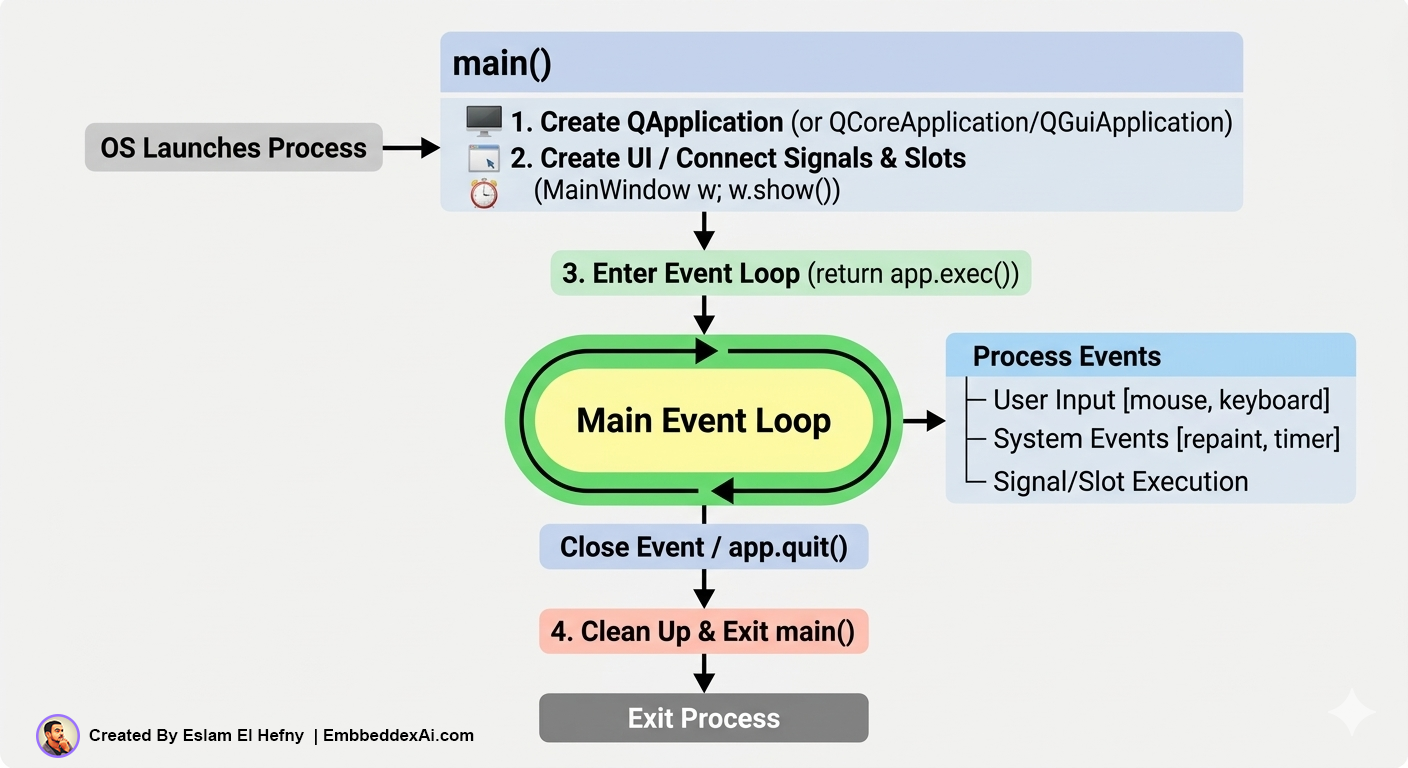
main.cpp — the entry point
#include <QApplication>
#include "mainwindow.h"

int main(int argc, char *argv[])
{
    QApplication app(argc, argv);   // manages the event loop + platform setup

    MainWindow window;              // create your main window
    window.show();                  // make it visible

    return app.exec();              // start the event loop — blocks here
}
mainwindow.h — class declaration
#ifndef MAINWINDOW_H
#define MAINWINDOW_H

#include <QMainWindow>

namespace Ui { class MainWindow; }

class MainWindow : public QMainWindow
{
    Q_OBJECT                        // REQUIRED — enables signals & slots

public:
    explicit MainWindow(QWidget *parent = nullptr);
    ~MainWindow();

private:
    Ui::MainWindow *ui;             // pointer to the generated UI class
};

#endif
mainwindow.cpp — implementation
#include "mainwindow.h"
#include "ui_mainwindow.h"          // auto-generated from mainwindow.ui

MainWindow::MainWindow(QWidget *parent)
    : QMainWindow(parent)
    , ui(new Ui::MainWindow)
{
    ui->setupUi(this);              // load & apply the .ui layout
    setWindowTitle("Hello, Qt!");
}

MainWindow::~MainWindow()
{
    delete ui;
}
5.4 Qt Application Lifecycle
5.5 Build and Run Shortcuts
| Action | Qt Creator Shortcut |
|---|---|
| Build | Ctrl+B |
| Run (build if needed) | Ctrl+R |
| Debug | F5 |
| Stop | Ctrl+. |
5.6 Hello World — Console Only
#include <QCoreApplication>
#include <QDebug>

int main(int argc, char *argv[])
{
    QCoreApplication app(argc, argv);   // no GUI — use Core not Application

    qDebug() << "Hello, Qt World!";     // cross-platform debug output

    return 0;
}
Use
QCoreApplicationwhen there is no GUI.qDebug()is Qt’s cross-platform console output stream.
6. Creating & Running a Qt App — Terminal & VSCode
6.1 The CMake Build Pipeline
Every Qt project goes through the same pipeline from source files to a running executable. Here is the full picture:
  Source Files                 CMake Layer                  Output
 ──────────────               ─────────────               ─────────
  main.cpp        ──┐
  mainwindow.cpp  ──┤         ┌────────────────┐
  mainwindow.h    ──┤──────►  │ cmake -S . -B  │ ──────►  Makefiles /
  mainwindow.ui   ──┤  uic►   │   build        │           Ninja files
  resources.qrc   ──┘  rcc►   └────────────────┘
  CMakeLists.txt  ────────►          │
                                     ▼
                            ┌────────────────────┐
                            │  cmake --build     │
                            │  g++ / clang++     │
                            │  MSVC              │
                            └────────────────────┘
                                     │
                                     ▼
                            ┌────────────────────┐
                            │  HelloQt.exe       │  ◄── final binary
                            │  HelloQt           │
                            └────────────────────┘
What each tool does automatically (via CMake flags):
| CMake Flag | Tool It Runs | Job |
|---|---|---|
CMAKE_AUTOMOC ON | moc | Generates meta-object code for signals & slots |
CMAKE_AUTOUIC ON | uic | Converts .ui XML → ui_mainwindow.h |
CMAKE_AUTORCC ON | rcc | Embeds .qrc resource files into the binary |
6.2 Project File Structure
A minimal Qt Widgets project looks like this on disk:
HelloQt/
├── CMakeLists.txt          ← build configuration
├── main.cpp                ← entry point
├── mainwindow.h            ← window class declaration
├── mainwindow.cpp          ← window class implementation
├── mainwindow.ui           ← Qt Designer XML layout
└── build/                  ← generated — never commit this
    ├── HelloQt.exe         ← final binary (Windows)
    ├── HelloQt             ← final binary (Linux/macOS)
    └── ui_mainwindow.h     ← auto-generated — never edit
Rule: Never edit anything inside
build/. It is regenerated on every build. Addbuild/to your.gitignore.
6.3 Minimal CMakeLists.txt (Annotated)
cmake_minimum_required(VERSION 3.16)
project(HelloQt LANGUAGES CXX)

# ── C++ standard ──────────────────────────────────────────
set(CMAKE_CXX_STANDARD 17)
set(CMAKE_CXX_STANDARD_REQUIRED ON)

# ── Qt automation ─────────────────────────────────────────
set(CMAKE_AUTOMOC ON)   # runs moc on Q_OBJECT classes
set(CMAKE_AUTOUIC ON)   # runs uic on .ui files → ui_*.h
set(CMAKE_AUTORCC ON)   # embeds .qrc resource files

# ── Find Qt 6 ─────────────────────────────────────────────
find_package(Qt6 REQUIRED COMPONENTS Widgets)

# ── Build target ──────────────────────────────────────────
add_executable(HelloQt
    main.cpp
    mainwindow.h
    mainwindow.cpp
    mainwindow.ui       # listed so CMake/AUTOUIC finds it
)

# ── Link Qt libraries ─────────────────────────────────────
target_link_libraries(HelloQt PRIVATE Qt6::Widgets)
6.4 Step-by-Step: Build from Terminal
The same three commands always apply — only the -G generator and paths differ per OS.
Step 1 — Open the right terminal
  Windows MinGW    →  Start Menu ► Qt 6.x.x ► MinGW x.x.x 64-bit
  Windows MSVC     →  Start Menu ► Visual Studio ► Developer PowerShell
  Linux / macOS    →  any terminal (bash / zsh)
Step 2 — Navigate to your project folder
cd ~/projects/HelloQt       # Linux / macOS
cd C:\projects\HelloQt      # Windows
Step 3 — Configure (generate build files)
Windows — MinGW
cmake -S . -B build -G "MinGW Makefiles"
Windows — MSVC
cmake -S . -B build -G "NMake Makefiles"
Linux / macOS
cmake -S . -B build -DCMAKE_PREFIX_PATH=~/Qt/6.x.x/gcc_64
If Qt is not found automatically, add
-DCMAKE_PREFIX_PATH=<path-to-Qt-kit>on any platform.
Expected output:
-- The CXX compiler identification is GNU 13.x.x
-- Found Qt6: /home/user/Qt/6.7.0/gcc_64 (found version "6.7.0")
-- Configuring done
-- Build files have been written to: /home/user/projects/HelloQt/build
Step 4 — Compile
cmake --build build
Parallel build (faster — uses all CPU cores):
cmake --build build -j$(nproc)    # Linux / macOS
cmake --build build -j4           # Windows (set manually)
Expected output:
[ 25%] Automatic MOC for target HelloQt
[ 50%] Building CXX object CMakeFiles/HelloQt.dir/main.cpp.o
[ 75%] Building CXX object CMakeFiles/HelloQt.dir/mainwindow.cpp.o
[100%] Linking CXX executable HelloQt
[100%] Built target HelloQt
Step 5 — Run the binary
Linux / macOS
./build/HelloQt
Windows
.\build\HelloQt.exe
On Windows, Qt DLLs must be on
PATH. The Qt MinGW shell sets this automatically. If you get a “DLL not found” error run:windeployqt build\HelloQt.exe
6.5 Terminal Command Reference
| Task | Command |
|---|---|
| Configure (auto-detect Qt) | cmake -S . -B build |
| Configure (explicit Qt path) | cmake -S . -B build -DCMAKE_PREFIX_PATH=<qt-path> |
| Configure — MinGW generator | cmake -S . -B build -G "MinGW Makefiles" |
| Build | cmake --build build |
| Parallel build | cmake --build build -j$(nproc) |
| Clean build outputs | cmake --build build --target clean |
| Full reset (delete & reconfigure) | rm -rf build && cmake -S . -B build |
| Run — Linux / macOS | ./build/HelloQt |
| Run — Windows | .\build\HelloQt.exe |
| Deploy Qt DLLs — Windows | windeployqt build\HelloQt.exe |
6.6 VSCode Setup — Step by Step
Step 1 — Install VSCode Extensions
Open VSCode and install these four extensions (Ctrl+Shift+X to open Extensions panel):
| Extension | Publisher | Purpose |
|---|---|---|
| C/C++ | Microsoft | IntelliSense, syntax highlighting, debugging |
| CMake Tools | Microsoft | Configure / build / run via CMake |
| CMake | twxs | CMake language support (syntax + snippets) |
| Qt Tools | tonka3000 | Qt documentation hover, QML support |
  Extensions Panel (Ctrl+Shift+X)
  ────────────────────────────────
  Search: "C/C++"       → Install  Microsoft C/C++
  Search: "CMake Tools" → Install  CMake Tools
  Search: "CMake"       → Install  twxs CMake
  Search: "Qt Tools"    → Install  Qt Tools
Step 2 — Open Your Project Folder
  File ► Open Folder...  (or drag folder onto VSCode window)
  ──────────────────────────────────────────────────────────
  Select:  C:\projects\HelloQt\   (Windows)
           ~/projects/HelloQt/    (Linux / macOS)
VSCode detects CMakeLists.txt automatically. You will see:
[CMake Tools] Would you like to configure this project? [Yes]
Step 3 — Select a Kit (compiler + Qt)
  Ctrl+Shift+P  ►  CMake: Select a Kit
  ─────────────────────────────────────
  Options shown:
    ✓ GCC 13.x.x x86_64-linux-gnu       ← Linux
    ✓ MinGW 13.x.x for Qt 6.7.0         ← Windows MinGW
    ✓ Visual Studio 2022 Release - amd64 ← Windows MSVC
If Qt is not found, proceed to Step 4. Otherwise skip to Step 5.
Step 4 — Tell VSCode Where Qt Is (if needed)
Create .vscode/settings.json in your project root:
{
    "cmake.configureArgs": [
        "-DCMAKE_PREFIX_PATH=C:/Qt/6.7.0/mingw_64"
    ]
}
Adjust the path for your OS and Qt version:
| OS | Example path |
|---|---|
| Windows MinGW | C:/Qt/6.7.0/mingw_64 |
| Windows MSVC | C:/Qt/6.7.0/msvc2019_64 |
| Linux | /home/user/Qt/6.7.0/gcc_64 |
| macOS | /Users/user/Qt/6.7.0/macos |
Step 5 — Build and Run
  ┌─────────────────────────────────────────────────────┐
  │  VSCode Status Bar (bottom of window)               │
  │                                                     │
  │  ⚙ Kit: MinGW  |  ▶ [HelloQt]  |  🔨 Build  |  ▷  │
  └─────────────────────────────────────────────────────┘

  F7         →  Build project
  Shift+F5   →  Run (no debugger)
  F5         →  Run with debugger attached
Step 6 — Debug Configuration (Optional)
Create .vscode/launch.json to enable F5 debugging:
{
    "version": "0.2.0",
    "configurations": [
        {
            "name": "Qt Debug",
            "type": "cppdbg",
            "request": "launch",
            "program": "${workspaceFolder}/build/HelloQt",
            "MIMode": "gdb",
            "cwd": "${workspaceFolder}",
            "externalConsole": false,
            "setupCommands": [
                { "text": "-enable-pretty-printing", "ignoreFailures": true }
            ]
        }
    ]
}
Windows MinGW: Also add
"miDebuggerPath": "C:/Qt/Tools/mingw1310_64/bin/gdb.exe"to point VSCode at the MinGW GDB.
VSCode Keyboard Shortcuts Summary
| Action | Shortcut | Notes |
|---|---|---|
| Open Extensions | Ctrl+Shift+X | Search for extensions |
| Command palette | Ctrl+Shift+P | Access all CMake commands |
| Select Kit | Ctrl+Shift+P → CMake: Select a Kit | Pick compiler + Qt |
| Configure | Ctrl+Shift+P → CMake: Configure | Regenerate build files |
| Build | F7 | Incremental build |
| Run (no debug) | Shift+F5 | Launch binary |
| Debug | F5 | Launch with GDB/LLDB |
| Toggle terminal | `Ctrl+`` | Open integrated terminal |
7. Qt Designer vs Qt Creator
7.1 Side-by-Side Comparison
flowchart LR
    subgraph Creator["Qt Creator — Full IDE"]
        direction TB
        C1[Code Editor]
        C2[Embedded Qt Designer]
        C3["Build System CMake / qmake"]
        C4[Debugger / Profiler]
        C5[Git Integration]
        C6[Device Deployment]
    end

    subgraph Designer["Qt Designer — UI Editor Only"]
        direction TB
        D1["Widget Box Drag and Drop"]
        D2[Form Canvas]
        D3[Property Editor]
        D4[Object Inspector]
        D5[Signal/Slot Editor]
    end

    Creator -- "embeds" --> Designer
| Qt Creator | Qt Designer | |
|---|---|---|
| Type | Full IDE | UI-only visual editor |
| Purpose | Code · Build · Debug · Deploy | Design .ui files visually |
| Standalone? | Yes | Yes — also embedded inside Creator |
| File types | .cpp .h .ui .qrc CMakeLists.txt | .ui only |
| Launch path | Qt/Tools/QtCreator/bin/qtcreator | Qt/6.x.x/<kit>/bin/designer |
7.2 Qt Creator — Modes & Panels
┌────────────────────────────────────────────────────────┐
│  Qt Creator                                            │
│                                                        │
│  [Edit Ctrl+2]  [Design Ctrl+3]  [Debug Ctrl+4]       │
│  [Projects Ctrl+5]  [Help Ctrl+6]                     │
│                                                        │
│  ┌─────────────┐  ┌──────────────┐  ┌──────────────┐  │
│  │ File Tree   │  │ Code Editor  │  │ Output Panel │  │
│  │             │  │   / Designer │  │ (Alt+3)      │  │
│  │ main.cpp    │  │   (embedded) │  │              │  │
│  │ mainwindow  │  │              │  │ Build Logs   │  │
│  │ .ui .h .cpp │  │              │  │ App Output   │  │
│  └─────────────┘  └──────────────┘  └──────────────┘  │
└────────────────────────────────────────────────────────┘
7.3 Qt Designer — Panel Layout
┌─────────────┬──────────────────────────┬───────────────┐
│ Widget Box  │     Form Canvas          │   Properties  │
│ ──────────  │                          │ ────────────  │
│ QLabel      │  ┌────────────────────┐  │  objectName   │
│ QPushButton │  │  Hello, Qt World!  │  │  geometry     │
│ QLineEdit   │  │                    │  │  text         │
│ QComboBox   │  │  [ Click Me ]      │  │  font         │
│ QCheckBox   │  │                    │  │  styleSheet   │
│ QSlider     │  └────────────────────┘  │  ...          │
│ QSpinBox    │                          │               │
│ ...         │                          │ Object Tree   │
├─────────────┴──────────────────────────┴───────────────┤
│  Signal / Slot Editor  │  Action Editor                │
└────────────────────────────────────────────────────────┘
7.4 The Full .ui → Executable Pipeline
flowchart TD
    A["Qt Designer\nDrag and drop widgets\nSet objectNames and properties"]
    B["mainwindow.ui\nXML file"]
    C["uic — UI Compiler\nrun automatically by CMake AUTOUIC"]
    D["ui_mainwindow.h\nauto-generated — never edit manually"]
    E["mainwindow.cpp\ninclude ui_mainwindow.h\nui->setupUi(this)"]
    F["moc — Meta-Object Compiler\nCMAKE AUTOMOC"]
    G["moc_mainwindow.cpp\nsignals and slots glue"]
    H["Compiler\ng++ / clang++ / MSVC"]
    I["HelloQt.exe"]

    A -->|save| B
    B -->|uic| C
    C --> D
    D --> E
    E --> H
    F --> G
    G --> H
    H --> I
Rules:
- Designer owns the layout → C++ owns the logic
- Never edit
ui_mainwindow.h— it regenerates every build - Every widget’s
objectNamein Designer becomesui->namein code
7.5 Signals & Slots — How Events Work
sequenceDiagram
    participant User
    participant QPushButton
    participant Qt Runtime
    participant MainWindow

    User->>QPushButton: clicks button
    QPushButton->>Qt Runtime: emit clicked()
    Qt Runtime->>MainWindow: invoke connected slot
    MainWindow->>MainWindow: on_myButton_clicked()
    MainWindow->>User: UI updates (label changes etc.)
Three ways to connect:
// 1. Auto-connect (naming convention — no code needed)
void MainWindow::on_myButton_clicked()      // on_<objectName>_<signal>
{
    ui->myLabel->setText("Button clicked!");
}

// 2. Explicit connect() in constructor
connect(ui->myButton, &QPushButton::clicked,
        this,         &MainWindow::onButtonClicked);

// 3. Lambda (inline — great for simple responses)
connect(ui->myButton, &QPushButton::clicked, this, [this]() {
    ui->myLabel->setText("Lambda clicked!");
});
7.6 Designer Inside Qt Creator — Workflow
flowchart LR
    A([Open Project]) --> B[Double-click mainwindow.ui]
    B --> C[Creator switches to Design Mode]
    C --> D[Drag widget from Widget Box]
    D --> E[Set objectName in Properties]
    E --> F["Right-click widget\nGo to slot..."]
    F --> G[Select signal e.g. clicked]
    G --> H["Creator jumps to Edit Mode\nGenerates slot stub in .cpp"]
    H --> I[Write your logic in the slot]
    I --> J[Ctrl+R — Build and Run]
    J --> K([Window appears])
7.7 Accessing Designer Widgets in Code
// In Designer: QPushButton objectName = "myButton"
//              QLabel     objectName = "myLabel"
//              QLineEdit  objectName = "myInput"

// In mainwindow.cpp — access via ui->
ui->myButton->setText("Clicked!");
ui->myButton->setEnabled(false);
ui->myLabel->setText("Hello from code");
QString text = ui->myInput->text();     // read user input
7.8 Launching Standalone Qt Designer
# Windows
C:\Qt\6.x.x\mingw_64\bin\designer.exe

# Linux
~/Qt/6.x.x/gcc_64/bin/designer

# macOS
~/Qt/6.x.x/macos/bin/Designer.app
Standalone Designer is identical to the embedded one in Qt Creator. Use it for UI-only work without the full IDE.
7.9 Which UI Approach to Use?
flowchart TD
    Q{What are you building?} --> A
    Q --> B
    Q --> C

    A["Complex form\nMany widgets\nRapid layout prototyping"] --> R1["Use Qt Designer .ui file"]

    B["Dynamic / runtime-created widgets\nSimple 1-2 widget window"] --> R2["Pure C++ — no .ui file\nCreate widgets in constructor"]

    C["Modern animated UI\nTouch / mobile interface\nEmbedded HMI screen"] --> R3["QML / Qt Quick\nDeclarative + C++ backend"]
Summary
mindmap
  root((Qt Session 1))
    What is Qt
      Cross-platform C++ framework
      GUI Embedded Mobile Web
    Why Qt
      Write Once Run Anywhere
      Signals and Slots
      Best-in-class tooling
    History
      1991 Trolltech founded
      2005 Qt 4 modular
      2012 Qt 5 QML
      2020 Qt 6 C++17
    Setup
      Online Installer
      Windows MinGW or MSVC
      Linux apt or installer
      macOS Xcode plus dmg
    First Program
      QApplication
      MainWindow
      app.exec event loop
    Terminal and VSCode
      CMake build system
      cmake S . B build
      VSCode CMake Tools
      F7 build Shift+F5 run
    Designer vs Creator
      Creator is the full IDE
      Designer edits .ui files
      uic generates ui header
      ui pointer accesses widgets
References
Official Qt Documentation
| Resource | URL |
|---|---|
| Qt 6 Documentation Home | https://doc.qt.io/qt-6/ |
| Qt 6 Getting Started | https://doc.qt.io/qt-6/gettingstarted.html |
| Qt Modules Overview | https://doc.qt.io/qt-6/qtmodules.html |
| Qt Widgets Module | https://doc.qt.io/qt-6/qtwidgets-index.html |
| QApplication Class | https://doc.qt.io/qt-6/qapplication.html |
| QMainWindow Class | https://doc.qt.io/qt-6/qmainwindow.html |
| Signals & Slots | https://doc.qt.io/qt-6/signalsandslots.html |
| Qt Designer Manual | https://doc.qt.io/qt-6/qtdesigner-manual.html |
| Qt Creator Manual | https://doc.qt.io/qtcreator/ |
CMake & Build System
| Resource | URL |
|---|---|
| CMake Documentation | https://cmake.org/documentation/ |
| Qt CMake Manual | https://doc.qt.io/qt-6/cmake-manual.html |
| Qt CMake Getting Started | https://doc.qt.io/qt-6/cmake-get-started.html |
CMAKE_AUTOMOC | https://cmake.org/cmake/help/latest/prop_tgt/AUTOMOC.html |
windeployqt | https://doc.qt.io/qt-6/windows-deployment.html |
Qt Online Installer
| Platform | Download |
|---|---|
| All platforms | https://www.qt.io/download-qt-installer |
| Qt Open Source | https://www.qt.io/download-open-source |
VSCode Extensions
| Extension | Marketplace |
|---|---|
| C/C++ (Microsoft) | https://marketplace.visualstudio.com/items?itemName=ms-vscode.cpptools |
| CMake Tools (Microsoft) | https://marketplace.visualstudio.com/items?itemName=ms-vscode.cmake-tools |
| CMake (twxs) | https://marketplace.visualstudio.com/items?itemName=twxs.cmake |
| Qt Tools (tonka3000) | https://marketplace.visualstudio.com/items?itemName=tonka3000.qtvsctools |
Community & Learning
| Resource | URL |
|---|---|
| Qt Forum | https://forum.qt.io/ |
| Qt Examples & Demos | https://doc.qt.io/qt-6/qtexamplesandtutorials.html |
| Qt on Stack Overflow | https://stackoverflow.com/questions/tagged/qt |
| Qt YouTube Channel | https://www.youtube.com/@QtStudios |